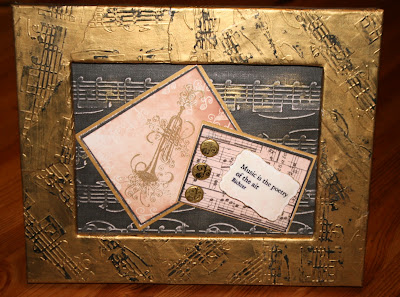
We are quite a musical family so collecting related crafting items just has to be high on the agenda. I used Aspects of Design Classical Instruments stamp set - the tracey Coats Collection from The Stamp Man to create this picture.
I also used
a cheap plain wooden frame made to take an 8" x 5.5" photo.
3 or 4 sheets plain white cardstock
Eco Green paints in Black and aged Gold
Cuttlebug music embossing folder
Core-dinations Black magic with a pale fleshy pink core
A piece of A6 silk art card for stamping
some matt gold cardstock for matting
Tim Holtz symphony tissue tape
some buttons (I used giant brads with the tails cut off , painted and stamped )
ink pads used were - Versamark, tattered rose distress ink, Black archival , gold and an old chestnut coloured dye
Glossy accents
a stick of lip salve or petrolium jelly for the paint resist technique.
sandpaper
a brayer
nestabilities
glue
To decorate the frame:-
Tear or cut out the white card into roughly A6 size pieces and paint them all black, once the paint is dry to the touch emboss them using the Cuttlebug die. Now tear up and glue the pices of embossed paper to the frame in a random pattern neatly folding the corners. I used a strong white glue for this and made sure each piece of paper was thoroughly coated.
Once the frame is covered with the black painted embossed card rub lip salve over the areas that are to stay black and then paint all over with the gold paint. When dry buff all over to polish it and reveal the distressed black areas.
For the inside of the frame:-
Background - Cut a piece of core dinations card slightly larger than the aperture (this will be aproximately A5 in size and should just fit into a Big Shot or Cuttlebug). Using the embossing folder emboss it right up to the short side then slide the folder along to emboss the other side so the whole piece is embossed. Using a sanding block or sandpaper take off the surface of the raised areas to reveal the cards core. Put a very small amount of gold paint on a piece of kitchen paper, blot it onto scrap paper then rub over some areas of the background, aim for a very light effect. Stick the background into the frame.
For the images- Cut a 4 1/8" x 3 1/4" piece from the silk art card, and trim the waste piece down to 3" x 2" approxmately for the sentiment piece. Using a versamark pad take a small musical stamp and stamp all around the edge of both pieces card. using a brayer and very light coating of chestnut coloured ink (roll excess onto a scap piece of paper first) roll right over the image from corner to corner, you can add more ink if you need to some areas. The versamark images resist the ink and are now revealed. Using the same brayer without reinking do the same with the smaller piece of card. Ink up with tattered rose and blot the same stamp and then apply all over the both pieces of card for a light background effect. Old ink pads are perfect for this light effect.
On the small piece of card stamp a sentiment using black archival ink and emboss to set the ink. Cut out the sentiment using a small nestability and run through again to emboss following instructions for your machine. Run the edges over the gold pad, dip into embossing powder and heat. Put glossy accents over the sentiment card and put aside to dry.
On the large piece of card stamp the instrument using a gold ink pad, sprinkle with clear embossing powder and heat. Cut out the mats and layers from the gold and black cardstock sanding the edges of the black and stick all three together.
Cut an atc sized (3 1/2" x 2 1/2" ) piece of core-dinations and stick the Tim Holtz tissue tap all over the pink reverse side of it. Distress with tattered rose or chestnut. Mat and layer it onto black (sanded and distressed) then gold card.
Arrange both matted and layered pieces in the frame and glue with stong glue. Stick the sentiment card on the atc with silicone glue and add 3 buttons also stuck with silicone.
It's easy to vary the theme with this project, I can imagine embossed cogs or timepieces around a Enjoy!

No comments:
Post a Comment