Monday, 4 July 2011

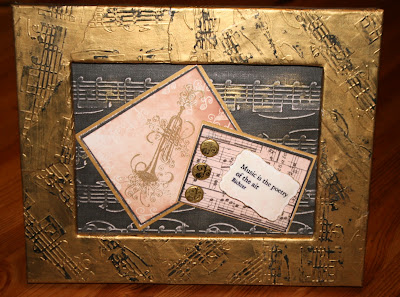
Music is the poetry of the air.


We are quite a musical family so collecting related crafting items just has to be high on the agenda. I used Aspects of Design Classical Instruments stamp set - the tracey Coats Collection from The Stamp Man to create this picture.

   I also used

a cheap plain wooden frame made to take an 8" x 5.5" photo. 
3 or 4 sheets plain white cardstock
Eco Green paints in Black and aged Gold
Cuttlebug music embossing folder
Core-dinations Black magic with a pale fleshy pink core
A piece of A6 silk art card for stamping
some matt gold cardstock for matting
Tim Holtz symphony tissue tape
some buttons (I used giant brads with the tails cut off , painted and stamped )
ink pads used were - Versamark, tattered rose distress ink, Black archival , gold and an old chestnut coloured dye
Glossy accents
a stick of lip salve or petrolium jelly for the paint resist technique.
sandpaper
a brayer
nestabilities
glue


To decorate the frame:-
Tear or cut out the white card into roughly A6 size pieces and paint them all black, once the paint is dry to the touch emboss them using the Cuttlebug die.  Now tear up and glue the pices of embossed paper to the frame in a random pattern neatly folding the corners.  I used a strong white glue for this and made sure each piece of paper was thoroughly coated.
Once the frame is covered with the black painted embossed card rub lip salve over the areas that are to stay black and then paint all over with the gold paint.  When dry buff all over to polish it and reveal the distressed black areas.

For the inside of the frame:-

Background - Cut a piece of core dinations card slightly larger than the aperture (this will be aproximately A5 in size and should just fit into a Big Shot or Cuttlebug).   Using the embossing folder emboss it right up to the short side then slide the folder along to emboss the other side so the whole piece is embossed.  Using a sanding block or sandpaper take off the surface of the raised areas to reveal the cards core.  Put a very small amount of gold paint on a piece of kitchen paper,  blot it onto scrap paper then rub over some areas of the background, aim for a very light effect.  Stick the background into the frame.

For the images-  Cut a  4 1/8" x 3 1/4" piece from the silk art card, and trim the waste piece down to 3" x 2" approxmately for the sentiment piece.  Using a versamark pad take a small musical stamp and stamp all around the edge of both pieces card. using a brayer and very light coating of chestnut coloured ink (roll excess onto a scap piece of paper first) roll right over the image from corner to corner, you can add more ink if you need to some areas.  The versamark images resist the ink and are now revealed.  Using the same brayer without reinking  do the same with the smaller piece of card.  Ink up with tattered rose and blot the same stamp and then apply all over the both pieces of card for a light background effect.  Old ink pads are perfect for this light effect.

On the small piece of card stamp a sentiment using black archival ink and emboss to set the ink.  Cut out the sentiment using a small nestability and run through again to emboss following instructions for your machine.  Run the edges over the gold pad, dip into embossing powder and heat.  Put glossy accents over the sentiment card and put aside to dry.

On the large piece of card stamp the instrument using a gold ink pad, sprinkle with clear embossing powder and heat.  Cut out the mats and layers from the gold and black cardstock sanding the edges of the black and stick all three together. 

Cut an atc sized (3 1/2" x 2 1/2" ) piece of core-dinations and stick the Tim Holtz tissue tap all over the pink reverse side of it.  Distress with tattered rose or chestnut.   Mat and layer it onto black (sanded and distressed) then gold card.

Arrange both matted and layered pieces in the frame and glue with stong glue.  Stick the sentiment card on the atc with silicone glue and add 3 buttons also stuck with silicone.

It's easy to vary the theme with this project, I can imagine embossed cogs or timepieces around a Enjoy!


Friday, 1 July 2011

Steampunk stamps have arrived! Twisted easel card.

My set of Creative Expressions Steampunk stamps arrived yesterday and it didn't take long before I was creating.   I decided to make a 6" square twisted easel card with Coredinations card as a distressed look works brill with these images. 

Folding the 12" x 6" card blank
Folded blank - Mark the botom of this triangle
 
For the card blank you need a piece of card 12" x 6" folded in half.  To get the twist  score and fold the front of your 6" x 6" card diagonally from corner to corner.  TIP. mark the bottom of the front triangle so that when you attach the decorated front you know which way up to place it. 
Cut a 5 3/4" square to matt onto the base, I stamped mine with some of the cogs in the sets before fixing it in place with screw top brads.  Cut out a coordinating 6" x 6" square for the front.  I distressed the edges of mine with and emery board.  The front is matted and layered with the shimmery mirror  card, and a third layer of coordinating cardstock.  TIP - An ideal way of measuring layers is to reduce the size of each layer by 1/4" which will give 1/8" border all round.  I had some corrugated card in my box so I tore and cut a piece to fit the front and distressed with black soot Ranger distress ink and ran a tiny bit of aged silver paint over the ridges.  Alternatively you could emboss the top mat and distress that. 

I stamped the train from the Vintage Illusion set using black archival ink onto shimmery mirror card.  Taking care not to smudge the ink I sprinked on clear embossing powder and heated to set the image.  I cut the image  to 4 3/4" x 2 3/4" and matted and layered it onto coordinating card distressing the bottom layer by sanding and inking.  The small image is from the Vintage Treasures set, stamped onto coredinations card and coated with glossy accents.  I cut the tails from two brads with wire cutters and glued them all into place with silicone glue to add dimension.  for further dimension I added chipboard cogs in painted with aged silver Eco Green paint.

An easel card needs something on the base to stop it from sliding down.  I made an atc sized stopper, 3.5" x 2.5" using mirror card, stamping and embossing a sentiment from the Vintage Treasures set.  A piece of the corrugated card, torn and embellished with more cogs and a piece of Tim Holtz chain finished the atc stopper.

Friday, 24 June 2011

Deco-lightful

Art Deco is one of my favourite styles, I was doubly excited to find Charles Rennie Mackintosh style roses with this stamp set from Dimension Fourth LTD.  The sentiment is from the stamp set of the same name also from Dimension Fourth.

I stamped onto smooth white card  using black soot distress ink, coloured with promarkers and used nestability dies to cut the main image and sentiment.  The matts for the main image and border were cut from Bazzill cardstock.  I went round the edges with a Zig emboss writer and dipped into a dark purple embossing powder then heated.  I added a plain white insert with a beautiful stamped greeting from the beauty set which was also embossed in purple.

Thursday, 23 June 2011

Big wool has arrived!


My extreme knitting wool arrived yesterday and I've already completed two more cushions!  This is so much faster than creating covers using machine patchwork, I can't believe how quickly they grew.  Can't wait to see them on the newly covered sofas.
On the left is my knitting bag, made using two log cabin quilt blocks

Tuesday, 21 June 2011

What to do next?

I'm eagerly awaiting the arrival of some extreme knitting wool! I have just finished a cushion cover using 4 strands on 15mm kneedles, it's a bit girly but once the rest of the wools arrive and I get the other cushions done I hope this one will just coordinate nicely. Somewhere in my fabric stash I have some silk fabric that I think will contrast nicely to the BIG knit look.

Saturday, 7 May 2011

Songbird, Birthday photo album


Front and back cover of the mini album I made for Chloe's 18th.  The chipboard book was quite inexpensive from do crafts, the die cuts from a Tim Holts collection at Sizzix and the music background a Sizzix embossing folder.  The bird was cut out twice, once using manuscript paper which I glued onto chipboard before tinting and coating with glossy accents.  I added some beads onto wires to embellish the cage.

Thursday, 5 May 2011

Handbag card


This clutch bag was made using KanBan cardstock and their Carnaby Street kit but absolutely anything would work here.  I also used a Sizzix Bigz die for the front flower embellishment which acts as a retainer for the bag flap plus a little co ordinating ribbon and a touch of glossy accents on the edge of the flower petals.  The card itself is hidden inside the bag.

To make the bag you need two pieces of A4 cardstock and some strong glue.  Fold and score one piece in half and then score again 1/4 inch from the first fold and again 1/4 inch on the same side of the card so you have 3 score lines in total.  Double score them on the reverse then fold them so you have a W shape on what will be the bottom of the card.  You should have one side that is wider than the other, this will be the back where you will attach the flap.

To make the flap take the second piece of card and cut a piece about 3 3/4" x 8 1/4" (the width of A4).  Score 3/4 of an inch from one long edge and fold.  Put some strong glue on the inside of the fold and attach to the back of the bag.  Use a corner punch to round the edges of the flap.  Add a strip of ribbon or similar to cover the join.  Stick the front embelishment on the opposite side to the flap with a dot of silicone glue remembering to allow for the flap to tuck underneath.   Once the glue is set turn over and stick in a co ordinating card fold up and tuck in the flap.